F5 Distributed Cloud Console
F5 Distributed Cloud Console is a SaaS control-plane for F5 Distributed Cloud services that provides a UI and API for managing network, security, and compute services.
F5 Distributed Cloud Console can manage “sites” in existing on-prem data centers and sites in AWS, Azure, and GCP cloud environments.
Using F5 Distributed Cloud Console, an end-user can centrally manage a distributed application environment.
Terminology
- Namespace
Namespace is a term that is commonly used in Kubernetes. It can be thought of as a grouping of resources.
Exercise 1: Find your Namespace
Please log into your assigned F5 Distributed Cloud tenant.
Note
Each F5 Distributed Cloud tenant has a unique login URL. If you are unsure which tenant you belong to, please post a question in the lab chat.
Note
The F5 Distributed Cloud Console GUI has a relatively short timeout. This is not configurable. We have an enhancement request to allow this to be configured.
Once you log in, you will need to identify your namespace.
Note
It will usually be the user-part of your F5 email address with the period replaced with a hyphen. For example, if your F5 email address is
j.smith @ f5.comyou can find a namespace ofj-smith. Please note this name and use it in later steps to make it easier for others to distinguish between resources in shared namespaces.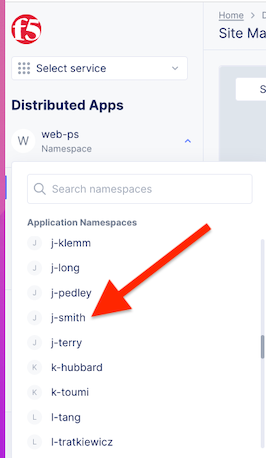
Exercise 2: Create a Site Token
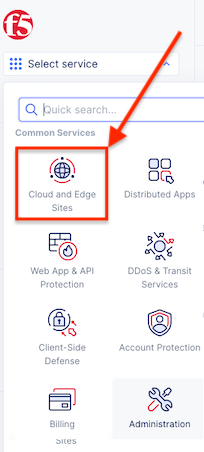
Next change to “Cloud and Edge Sites” space from “Select service” pulldown.
Once in the “Cloud and Edge Sites” space go to the “Site Management” menu and click on “Site Tokens”.
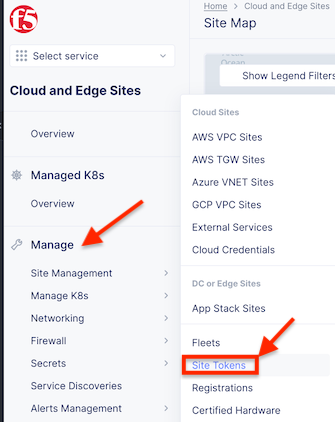
Click on “Add Site Token”.
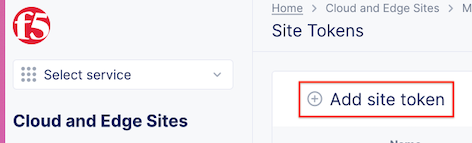
Provide a name for the token.
You can use the same unique name that was assigned for your namespace (i.e. first initial-lastname).
Record the “UID” that is created. You will later use this when you add a site.
Exercise 3: Retrieve latitude/longitude
F5 Distributed Cloud uses the latitude/longitude of a site to assist in finding the closest geographic Regional Edge locations. The following is meant to help you find a location that is close to the UDF deployment location that you selected.
One method of finding a location is to search Google Maps, right click and highlight the GPS coordinates. This will copy the values into your clipboard.

Pick a location that is geographically similar to where you selected your UDF deployment (i.e. for Virginia, USA search for Washington Monument, DC)
You could also use a regional office (vs. your home address) as a location https://www.f5.com/company/contact/regional-offices
Once you have a reasonable set of latitude/longitude you can proceed.
Exercise 4: Configure Site using Site UI
Note
If you prefer to use the CLI see Add a Site (via CLI)
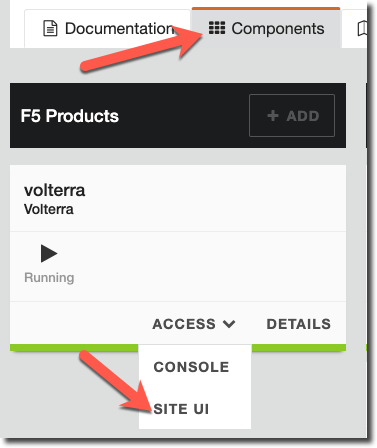
From your UDF Deployment find your “volterra” component and click on “Site UI”.
Change Password
The local F5 Distributed Cloud Node UI will prompt you to login:
Variable
Value
Username
admin
Password
Volterra123
Change the default password
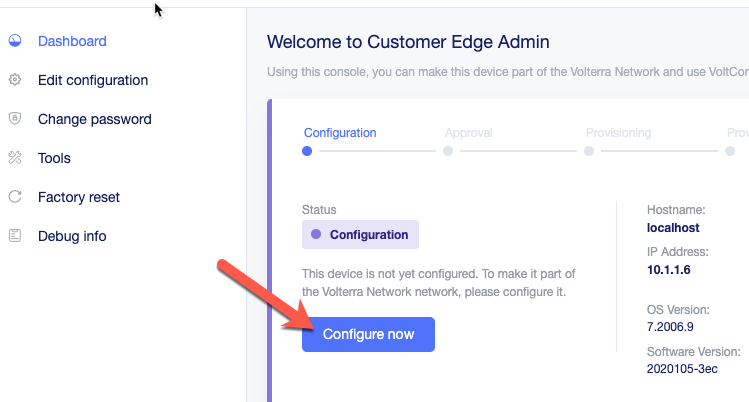
If you are using the GUI, click on “Configure Now”.
Enter the following information.
Variable
Value
Token
[use one created previously]
Cluster Name
[unique name]-udf
Hostname
main-0
Certified Hardware
kvm-voltmesh
Primary Outside NIC
eth0
Latitude/Longitude
Click on “Save Configuration”.
Exercise 5: Accept Registration
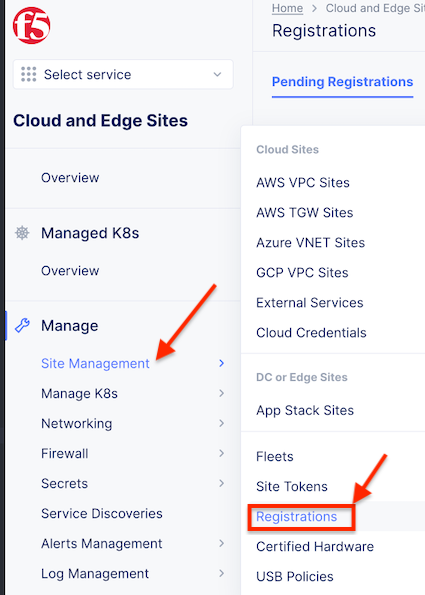
Go back to F5 Distributed Cloud Console to “Accept” the registration.
Go to “Cloud and Edge Sites->Site Management->Registrations”.
Click on the “checkmark” icon to accept the registration.
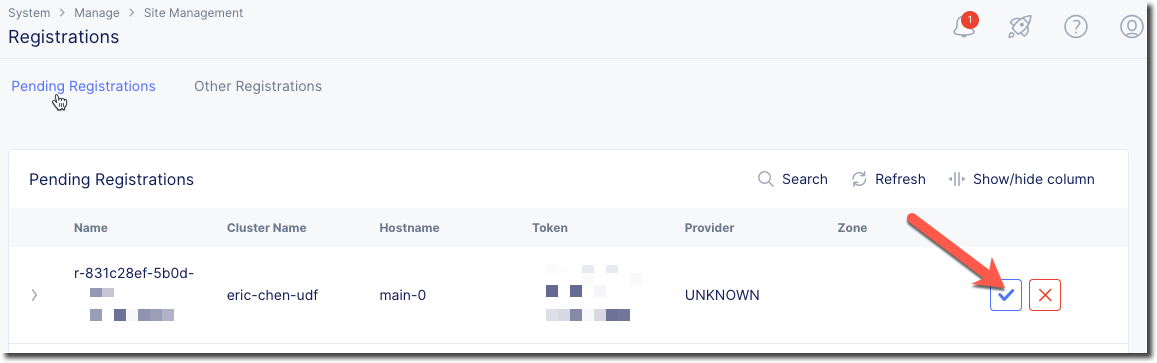
Click on “Accept” to use the default values (we will modify these in a later lab).
This will start the process of loading the F5 Distributed Cloud software that is necessary to connect the site to a F5 Distributed Cloud Regional Edge site.
Note
It will take several minutes for this to complete. You can continue to the next step while you wait for it to complete.