Creating Azure VNET Site
Note
This is an optional exercise. This requires access to an Azure Subscription and a user with Owner role.
In this exercise we will deploy an Azure site from the F5 Distributed Cloud Console.
Exercise 1: Add Azure site
In Distributed Cloud Console and switch to the Cloud and Edge Sites context. It can be access either from the Home page or an internal page.
Navigate to “Manage” -> “Site Management” -> “Azure VNET Sites”.
Click “Add Azure VNET Site”
You will need to provide the following information:
Name: [unique name]-azure
Resource Group: [unique name]-azure-site
Vnet: Existing Vnet (change from default)
Existing Vnet Resource Group: [unique name]-azure
Existing Vnet Name: f5demo_vnet
Select Ingress Gateway …: Ingress/Egress Gateway (Two Interface)
After you select “Ingress/Egresss Gateway (Two Interface) click on “Configure”
Azure AZ Name: 1
Subnet for Inside Interface: Existing Subnet
Subnet Resource Group: Resource Group Name (change from default)
Resource Group Name: [unique name]-azure
Subnet Name (Inside Interface): internal_subnet
Subnet for Outside Interface: Existing Subnet
Subnet Resource Group: Resource Group Name
Resource Group Name: [unique name]-azure
Subnet Name (Outside Interface): external_subnet
Next you will configure routes to enable access to the “workload” VM in your Azure site.
Under “Advanced Options” click on “Show Advanced Fields”.
Select Global Networks to Connect: Connect Global Networks
Click on “Configure” (appears after changing to “Connect Global Networks”)
Select Network Connection Type: Site Local Inside to a Global Network (default)
Global Virtual Network: [unique name]-global
Click on “Apply”
Next you will configure static routes.
Manage Static Routes for Inside Network: Manage Static Routes
You should now see new options.
Static Route Config Mode: Custom Static Route
You should now see a “Configure” option under Static Route Config Mode
Click on “Configure”.
Subnets: Click on “Add Item”
Version: IPv4 Subnet
Prefix: 10.2.2.0
Prefix Length: 24
You will now configure the Nexthop section.
Type: User Configured
Version: IPv4 Address (default)
IPv4 Address: 10.2.1.1
Network Interface: [leave blank]
Next you will configure “Attributes”
Install Host OS
Install Forwarding
Click on “Apply”
Under “Select Automatic or Assisted
Automatic Deployment: system/[unique name]-azure (cloud credential created earlier)
Click on “Save an Exit”
Click on “Apply” for your newly created site.
Exercise 2: Configure Route table
In this next exercise we will update an Azure Route Table to direct traffic from the workload subnet to the F5 Distributed Cloud Gateway.
First look in the resource group that was created by F5 Distributed Cloud. It should be called [unique name]-azure-site. Find the inside interface of the F5 Distributed Cloud gateway. It should be on the 10.2.1.x network. You will need this value later.
From the Azure Portal find your resource group that you created via terraform ([unique name]-azure) and open up the “workload_rt” object (Route Table) and then click on “Routes”
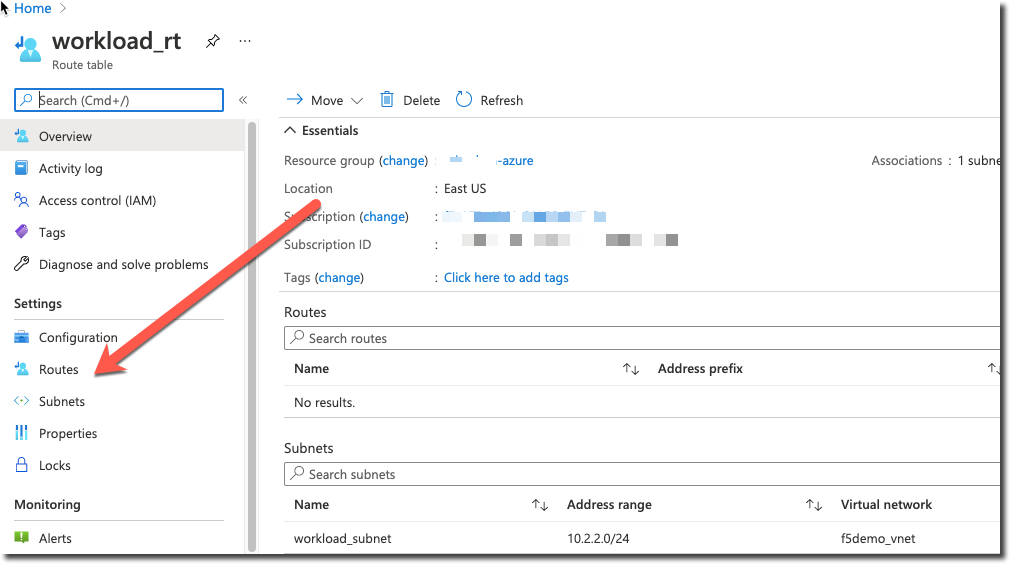
Click on “Add”
Route name: volterra_gateway
Address prefix: 0.0.0.0/0
Next hop type: Virtual Appliance
Next hop address: 10.2.1.X (use the IP address of the inside interface of the F5 Distributed Cloud gateway)
Click on “OK”
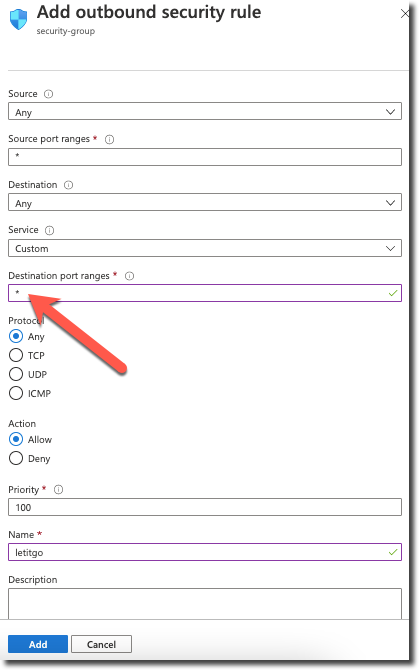
Exercise 3: Modify Network Security Group
From the Azure Portal.
In the
[unique-name]-azure-sitefind the F5 Distributed Cloud Gateway resource (virtual machine).Under Networking find the Network Security Group that is associated with the interface and modify the outbound port rules to create a new rule that allows access to all destinations.
Exercise 4: Test your connections
From UDF on the “Global Network Client” you should now be able to connect to http://10.2.2.4:8080/txt
ubuntu@ubuntu:~$ curl 10.2.2.4:8080/txt
================================================
 ___ ___   ___                    _
| __| __| |   \ ___ _ __  ___    /_\  _ __ _ __
| _||__ \ | |) / -_) '  \/ _ \  / _ \| '_ \ '_ \
|_| |___/ |___/\___|_|_|_\___/ /_/ \_\ .__/ .__/
                                      |_|  |_|
================================================

      Node Name: Azure Environment
     Short Name: workload

      Server IP: 10.2.2.4
    Server Port: 8080

      Client IP: 10.1.1.4
    Client Port: 36242

Client Protocol: HTTP
 Request Method: GET
    Request URI: /txt

    host_header: 10.2.2.4
     user-agent: curl/7.58.0
You should also be able to run ssh azureuser@10.2.2.4 from the “Global Network Client” host
in UDF (the ssh key is installed on the Client already).
Once on that host you should be able to connect to http://10.1.20.5/txt (the Global Network Client in UDF)
================================================
 ___ ___   ___                    _
| __| __| |   \ ___ _ __  ___    /_\  _ __ _ __
| _||__ \ | |) / -_) '  \/ _ \  / _ \| '_ \ '_ \
|_| |___/ |___/\___|_|_|_\___/ /_/ \_\ .__/ .__/
                                      |_|  |_|
================================================

      Node Name: UDF Environment (demo app)
     Short Name: ubuntu

      Server IP: 10.1.20.5
    Server Port: 80

      Client IP: 10.2.2.4
    Client Port: 32860

Client Protocol: HTTP
 Request Method: GET
    Request URI: /txt

    host_header: 10.1.20.5
     user-agent: curl/7.58.0