Assisted Deployment
This is an optional lab exercise that goes through an “Assisted Deployment”. This allows you to deploy a F5 Distributed Cloud site without the need to share your AWS credentials with the F5 Distributed Cloud Console. Instead you will deploy a site from the F5 Distributed Cloud terraform container that can be run on your local workstation.
The following is adapted from: https://www.volterra.io/docs/how-to/site-management/create-aws-site
Download Terraform Parameters
When creating an AWS VPC Site make sure that you select “Assisted Deployment” instead of “Automated Deployment”.
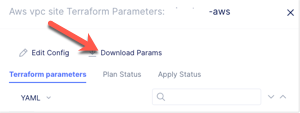
After you save the site you will need to download the Terraform parameters.
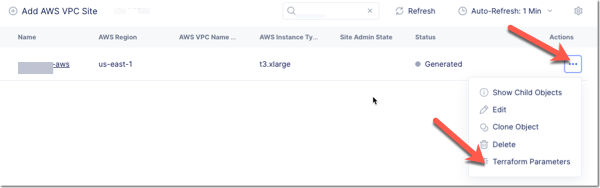
Download the terraform variables in case of assisted deployment. Navigate to the created AWS VPC site object using the Manage -> Site Management -> AWS VPC Site path.
Find your AWS VPC site object and click … -> Terraform Parameters for it. Copy the parameters to a file in your local machine.
API Certificate
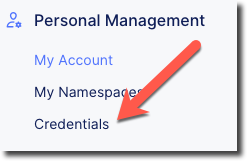
From the top right of the F5 Distributed Cloud Console click on the “Account” icon.

Click on “My Account”
On the menu on the left click on “Credentials”.
Click on “Create Credentials”
Enter the requested information for
Name: [unique name]-api
Credential type: API Certificate
Password: [this password will be used to encrypt the certificate]
Expiry Date: Desired expiration Date
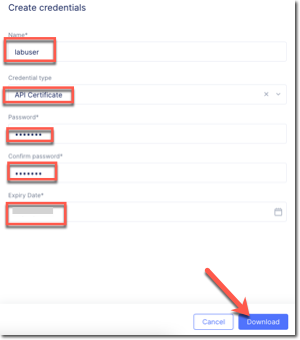
Click on “Download” to download the certificate as a .p12 file.
Docker container
Note
This assumes that you have already installed Docker on your workstation/server.
Next you will want to run the latest version of the F5 Distributed Cloud terraform container.
$ docker pull gcr.io/volterraio/volt-terraform:latest
After this completes you can run
$ docker run --entrypoint tail --name terraform-cli -d -it -w /terraform/templates -v ${HOME}/.ssh:/root/.ssh gcr.io/volterraio/volt-terraform:latest -f /dev/null
You can next run the following command to enter the docker container.
$ docker exec -it terraform-cli sh
You can run some commands to explore what is in the container.
$ /terraform/templates #
  /terraform/templates # ls
  ce-multi-2nic-azure   ce-single-2nic-aws    ce-single-aws         ce-single-vsphere     quickstart-webapp
  ce-multi-aws          ce-single-2nic-azure  ce-single-azure       hello-cloud           self-serve
  ce-multi-azure        ce-single-2nic-gcp    ce-single-gcp         hello-edge            views
Docker Container files
In a different terminal window you can copy into the container your API Certificate and terraform parameters file.
$ docker cp /Users/labuser/Downloads/[tenant name].console.ves.volterra.io.api-creds.p12 terraform-cli:/var/tmp
$ docker cp /Users/labuser/Downloads/system-labuser-aws.json terraform-cli:/var/tmp
Docker Container environment variables
To execute the terraform code you will need to set environment variables that will allow you to authenticate to both F5 Distributed Cloud and AWS.
F5 Distributed Cloud requires the following set of environment variables.
export VES_P12_PASSWORD=[password for api certificate]
export VOLT_API_P12_FILE=/var/tmp/[tenant name].console.ves.volterra.io.api-creds.p12
export VOLT_API_URL=https://[tenant name].console.ves.volterra.io/api
export TF_VAR_akar_api_url=https://[tenant name].console.ves.volterra.io/api
For AWS you will need to specify
export AWS_ACCESS_KEY_ID="[AWS Key]"
export AWS_SECRET_ACCESS_KEY="[AWS secret key]"
export AWS_SESSION_TOKEN="[AWS session for STS tokens]"
Docker Container terraform apply
You can then change into the desired template to deploy the site.
/terraform/templates # cd views/aws-volt-node/
/terraform/templates/views/aws-volt-node # terraform init
/terraform/templates/views/aws-volt-node # terraform plan -var-file=/var/tmp/system-labuser.json
/terraform/templates/views/aws-volt-node # terraform apply -var-file=/var/tmp/system-labuser.json
Note that you may need to specify an existing S3 bucket that will be used to store the terraform state files.
Once the terraform completes you should be able to the nodes appear in F5 Distributed Cloud Console.